Blow them away with high-key headshot lighting

Hello and welcome to my blog. My first ever blog! I’ll do my best to avoid stream of consciousness ramblings. Give me a poke if I do – ‘hey Myles get back on track!’. So what will you get? Basically I’ll be unloading my brain. That means all the experience I’ve gained over 20 years as a headshot and fashion photographer and more recently as a Showit website builder. I’ll help you with some branding and design tips and a few tricks I’ve learnt in social media. My loves are food, art, design, music architecture, fashion and of course headshot photography. These loves will feature too. As they say, write what you know.

A little background on Myles, founder of Photoform*
I first picked up a camera in high school back in the 80s. I was rocking fluffy big hair, a hideous aqua ensemble and a Canon AE1 Program SLR (single lens reflex). Actually rocking my Dad’s Canon AE1. I got the photography bug and did work experience in the local paper (South Western Times). This was in the black and white film and dark room days. The photographer’s loved it, they would go off to the pub and leave me to develop and process the advertising work. Advertising work you say? You might be thinking glamorous photos of models. No, we’re talking black and white photos of meat trays from Dardanup Butcher’s.
I put photography on the back burner for many years as I figured myself out and figured out what I wanted to do (or more like what my parents wanted me to do). Fast forward many years and many hangovers, to studying Journalism at University of Technology Sydney. I’d dabbled with writing and decided to be a Journalist. I quickly discovered I would only ever be a mediocre writer but I could be a great photographer. I bought a DSLR on a whim and I was hooked – again.
Photography lesson #1 – RTFM!
No friend, animal or lamp post was safe from my camera. I photographed anything and everything, learning as I went. I learnt the basics of composition and how to operate the camera. I did a photography subject at Uni and the first lesson I got was the same one I give to anyone who asks me how they can be a better photographer. RTFM. Read The eFfing Manual! And read it 5 times. If you don’t understand how to use your equipment you’re never going to be a great photographer. Your camera and equipment should have a direct connection to your brain, so it becomes an extension of yourself and you aren’t thinking about how it works. There you go, your first lesson – RTFM.
My first professional gig was for a street mag in Sydney called SX. They did a profile on me for a story about a photograph I took and asked me to send my own photo. Smelling an opportunity I offered to take their profile story photos, starting for free. Lesson number two – seize every opportunity. You never know where it will come from.
So I started shooting their profile pictures, they liked my work and free work turned into paid. I would shoot their covers for the grand total of $250. Hey it was better than working for free.
Lights, camera, drama!
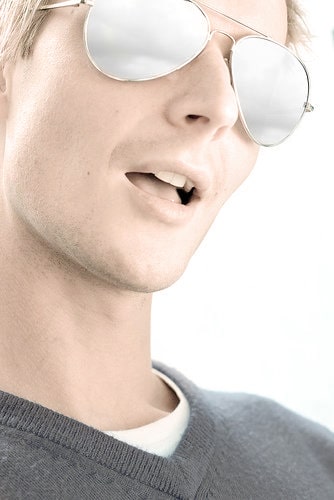
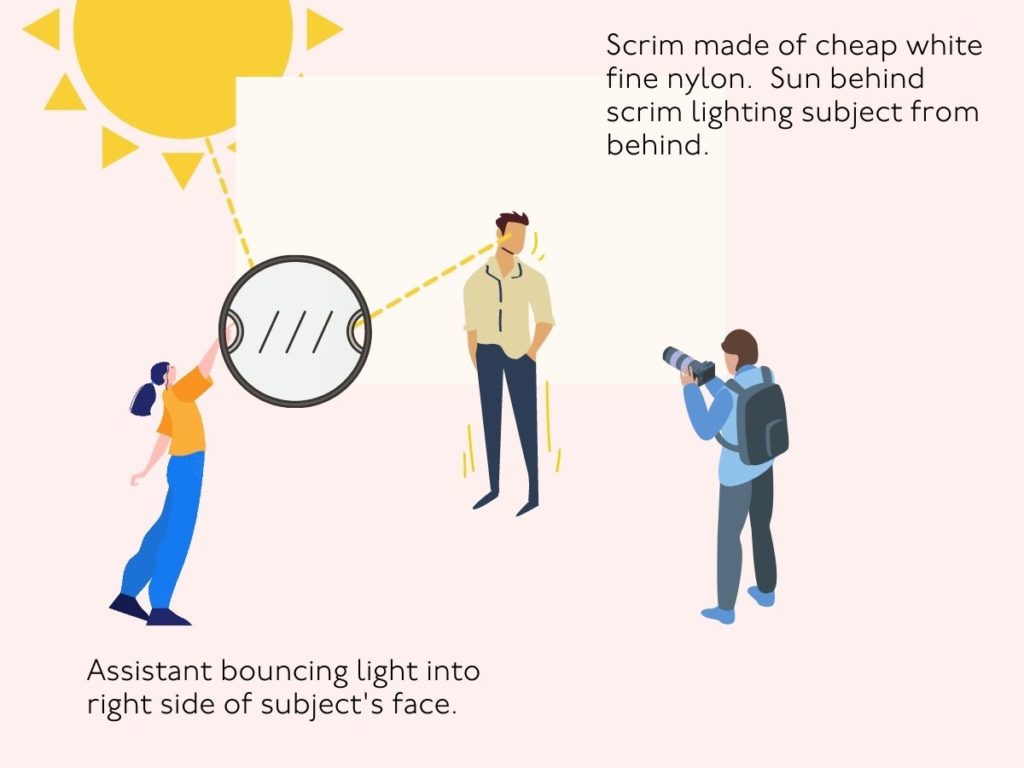
I remember the first photograph I was really proud of, a photo to go with a profile piece of a Big Brother contestant (Zach Douglas). I had planned the look, a high key headshot (very bright) with a home made diffuser behind my subject and an assistant holding a reflector to bounce light into the right side of my subject’s face. The assistant being a friend I begged to come along.
I was so excited by the shoot I could barely sleep the night before. It was at Westfield Parramatta and we found a carpark with the right conditions. It was pretty funny, there were hundreds of Big Brother fans (BB was pretty big then) and we had a security guard holding back the people. I was in my element. I’ve never minded a bit of attention (cos I’m a Leo?!) and loved the added drama of the security guard yelling “stay back shoot in progress!”

How I achieved the high-key headshot look
Let’s peer behind the curtain and I’ll show you how it’s done. Diagram below, I had someone holding the fabric up but you can MacGyver up a frame made of PVC tubes and buy the thin nylon at a fabric store, cheap fabric is fine. I now have a fancy one but when budget is tight (when isn’t it am I right?) you can make do.

The high-key headshot look is one of those fundamental looks that is used all the time in photography. The background is pure white and it’s used a lot in product and headshot photography as it creates a graphic, clean image. If you’re planning on being a professional headshot photographer you need a bunch of lighting setups and styles in your bag of tricks so you can hit all kinds of briefs.
If you’ve got a hunger to learn more about lighting, check out my other blog post – learn to master natural light like a boss.
If you’re ever unsure of anything I discuss, drop your question in the comments or shoot me an email and I’ll answer it.
If you loved the photographs here, head over to our Photoform* headshot photography site. We’ll help you elevate your online presence with headshot photography and personal branding images.
Until next time chook.
Myles

Published by
Myles Formby is an award winning headshot and personal branding photographer based in Melbourne. He is the founder of Photoform*.
His work is technically precise and full of life. He has developed a reputation for extracting natural performances on camera from anyone.
He has worked as an editorial and fashion photographer and has a deep understanding of colour and lighting.
He's been published in Vogue and worked for national brands like Westfield and JB Hi-Fi.
Copyright Myles Formby Photoform* 2025. All rights reserved. Unauthorised use of images and content is prohibited without prior written permission.
share this post